JiamingBlogger

2016年1月16日 星期六

Customize the FileInputFormat to Read Whole File

In MapReduce, the Map task reads input text file line by line, as following pattern
key_1   ..... line_1 in content......
key_2   ..... line_2 in content......
.
.
.
key_n   ..... line_n in content......
.
.
.
This is because the default TextInputFormat uses the LineRecordReader to read the input line by line. InLineRecordReader
  public boolean nextKeyValue() throws IOException {
    if (key == null) {
      key = new LongWritable();
    }
    // Using the position of line to be the key.
    key.set(pos);
    if (value == null) {
      value = new Text();
    }
    int newSize = 0;
    while (pos < end) {
      // Reading a line of input file.
      newSize = in.readLine(value, maxLineLength,
                            Math.max((int)Math.min(Integer.MAX_VALUE, end-pos),
                                     maxLineLength));
      if (newSize == 0) {
        break;
      }
      pos += newSize;
      if (newSize < maxLineLength) {
        break;
      }

      // line too long. try again
      LOG.info("Skipped line of size " + newSize + " at pos " +
               (pos - newSize));
    }
    ...
 }
So, to read the whole file to Map task, we have to customize the methon nextKeyValue().
  1. Creating an class WholeFileRecordReader extends the RecordReader.
    class WholeFileRecordReader extends RecordReader<NullWritable, Text>
    
    Note: In this example, we do not need the position and don't have to specify the key, so using NullWritable as the key type.
  2. Implementing the method nextKeyValue() as following.
     public boolean nextKeyValue() throws IOException {
         if (!processed) {
             byte[] contents = new byte[(int) fileSplit.getLength()];
    
             Path file = fileSplit.getPath();
             FileSystem fs = file.getFileSystem(conf);
    
             FSDataInputStream in = null;
             try {
                 in = fs.open(file);
                 IOUtils.readFully(in, contents, 0, contents.length);
                 value.set(contents, 0, contents.length);
             } finally {
                 IOUtils.closeStream(in);
             }
             processed = true;
             return true;
         }
         return false;
     }
    
  3. Creating WholeFileInputFormat extends the FileInputFormat, which is the class to configure and read the split.
    public class WholeFileInputFormat extends FileInputFormat<NullWritable, Text>
    
  4. Implementing two method as following.
     @Override
     protected boolean isSplitable(JobContext context, Path filename) {
         return false;
     }
    
     @Override
     public RecordReader<NullWritable, Text> createRecordReader(
       InputSplit split, TaskAttemptContext context) {
         return new WholeFileRecordReader();
     }
    
  5. Specifying the input format class as WholeFileInputFormat.
     Job job = Job.getInstance(conf, "Mapper Practice Three");
     job.setJarByClass(PracticeThree.class);
     job.setMapperClass(PracticeThreeMapper.class);
     job.setOutputFormatClass(NullOutputFormat.class);
    
     job.setNumReduceTasks(0);
     job.setInputFormatClass(WholeFileInputFormat.class);
         FileInputFormat.addInputPath(job, new Path(args[0]));
     System.exit(job.waitForCompletion(true) ? 0 : 1);
張貼者: Unknown 於 晚上10:18 沒有留言:
以電子郵件傳送這篇文章BlogThis!分享至 X分享至 Facebook分享到 Pinterest
標籤: Hadoop, MapReduce

Vasya - Clerk

Description

The new "Avengers" movie has just been released! There are a lot of people at the cinema box office standing in a huge line. Each of them has a single 100, 50 or 25 dollars bill. A "Avengers" ticket costs 25 dollars.
Vasya is currently working as a clerk. He wants to sell a ticket to every single person in this line.
Can Vasya sell a ticket to each person and give the change if he initially has no money and sells the tickets strictly in the order people follow in the line?
Return YES, if Vasya can sell a ticket to each person and give the change. Otherwise return NO.

Solution

from operator import add
def tickets(people):
    deposit = [0,0,0]
    for p in people:
        if p == 25:
            deposit = map(add, deposit, [1,0,0])
        elif p == 50:
            deposit = map(add, deposit, [-1,1,0])
        else:
            if deposit[0] >=1 and deposit[1] >=1:
               deposit = map(add, deposit, [-1,-1,0])
            elif deposit[1] == 0 and deposit[0] >=3:
               deposit = map(add, deposit, [-3, 0, 0])
            else:
               deposit = map(add, deposit, [-3, 0, 0])
        if deposit[0] < 0 or deposit[1] < 0 or deposit[2] < 0: return 'NO'
    return 'YES'


張貼者: Unknown 於 清晨5:12 沒有留言:
以電子郵件傳送這篇文章BlogThis!分享至 X分享至 Facebook分享到 Pinterest
標籤: codewars, python

Storage: Configure Disks, Partitions and Disk Mount to fit with Hadoop

Disk configuration

Namenode

RAID1 is recommended for the namenode’s disks, to protect against corruption of its metadata.

DataNodes


  • JBOD(No RAID) is recommended.
  • One disk for the operation system specifically, others for Hadoop data storage.
  • Partition looks like following. 
  • Partition the remaining Data Storage disks.
    1. Create Partition
      fdisk /dev/sdb
      
    2. Press n to create a new partition.
    3. One partition table for each disk. Using the default in the remaining options.
    4. Press w to write table to disk.
    5. Format the disk.
      mkfs -t ext4 /dev/sdb1
      
    6. Repeat the above steps for other Data Storage Disk.
  • Mounting disk with noatime and nodiratime. As Hadoop (HDFS) manages the metadata (inode) of its filesystem with NameNode, any access time information kept by Hadoop is independent of the atimeattribute of individual blocks. So, the access timestamps in DataNode's local filesystem makes no sense here.
    1. Create the mount points
      mkdir -p /mnt/d0/data
      mkdir -p /mnt/d1/data
      
    2. Appending the following rules to the file /etc/fstab.
      /dev/sdb1 /mnt/d0/data ext4 defaults,noatime,nodiratime 0 0
      /dev/sdc1 /mnt/d1/data ext4 defaults,noatime,nodiratime 0 0
      
    3. Mounting the disk.
      mount /dev/sdb1
      mount /dev/sdc1
      
  • Reduce the reserved blocks on the disks
    tune2fs -m 1 /dev/sdb1
    tune2fs -m 1 /dev/sdc1
    
    Note: Do not reduce the reserved blocks on the disks hosting the operating system.

Configure hdfs-site.xml

Note: assume the ssh key has been distributed to the Datanodes
  • Creating folders to presist HDFS data
    mkdir /mnt/d0/data/dfs
    mkdir /mnt/d1/data/dfs
    
  • Changing the owner to hdfs
    chown hdfs:hdfs -R /mnt/d0/data/dfs
    chown hdfs:hdfs -R /mnt/d1/data/dfs
    
  • Add the following property
    hadoop@master1$ vi $HADOOP_HOME/conf/hdfs-site.xml
    <property>
      <name>dfs.datanode.data.dir</name>
      <value>/mnt/d0/data/dfs,/mnt/d1/data/dfs,...,/mnt/dn/data/dfs</value>
    </property>
    
  • Redo the previous step on all the Datanodes.
  • Restarting HDFS, on Namenode host
    hdfs@namenode$ $HADOOP_HOME/bin/stop-dfs.sh
    hdfs@namenode$ $HADOOP_HOME/bin/start-dfs.sh
    
    Note: To do this step, it required the ssh key has been distributed across the Clusters.

Conigure mapred-site.xml

  • Creating the folder for MapReuce to cache intermediate data.
    mkdir /mnt/d0/data/mapred
    mkdir /mnt/d1/data/mapred
    
  • Changing the owner to hdfs
    chown mapred:hadoop -R /mnt/d0/data/mapred
    chown mapred:hadoop -R /mnt/d1/data/mapred
    
  • Add the following property
    hadoop@master1$ vi $HADOOP_HOME/conf/hdfs-site.xml
    <property>
      <name>dfs.datanode.data.dir</name>
      <value>/mnt/d0/data/mapred,/mnt/d1/data/mapred,...,/mnt/dn/data/mapred</value>
    </property>
    
  • Redo the previous step on all the Datanodes.
  • MapReduce restart.
張貼者: Unknown 於 凌晨1:32 沒有留言:
以電子郵件傳送這篇文章BlogThis!分享至 X分享至 Facebook分享到 Pinterest
標籤: Hadoop, Operation

Spark Laoding Data From S3

AWS Configuration

  1. Select IAM Service
  2. Create User and Copy the Access Key ID and Secret Access Key
  3. Create Group and attach Policy(AmazonS3FullAccess).
  4. Create S3 Bucket

Spark application in Scala

    val sc = new SparkContext(new SparkConf().setAppName("Recommender").setMaster("local[2]"))
    val hadoopConf = sc.hadoopConfiguration
    hadoopConf.set("fs.s3n.awsAccessKeyId", "***")
    hadoopConf.set("fs.s3n.awsSecretAccessKey", "***")
    val base = "s3n://lin-spark-sample/ch3/"
    val rawUserArtistData = sc.textFile(base + "user_artist_data.txt")
Using the s3n scheme
張貼者: Unknown 於 凌晨12:46 沒有留言:
以電子郵件傳送這篇文章BlogThis!分享至 X分享至 Facebook分享到 Pinterest
標籤: Scala, Spark

Using Maven to build Spark Job in Scala

Prerequired

Scala IDE.
Preinstalled Spark for cluster or stand alone mode.

Create Project and Maven Setup.

  1. Create an Maven Project.
  2. At the step of Select an Archtype, choose maven-archtype-quickstart.
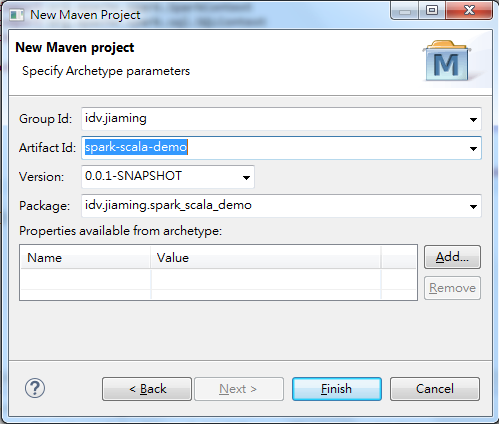
  3. Fill in the Group ID and Artifated ID as follows, and press Finish.
    New Project Arch
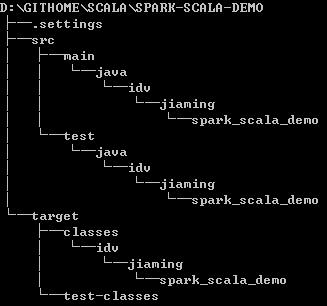
  4. Scala IDE will help you to setup the Maven project. Initially the directories tree would looks like this...
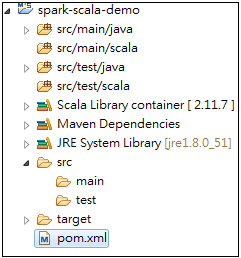
  5. On the Scala IDE, add two folders named scala under /src/main and /src/test respectively. The /src/main/scala is the main location we place the Scala source code and package.
  6. Add these two directories /src/main/scala and /src/test/scala to the Source Folder by right click on the /src/main/scala folder, find Build Path then select Use as Source Folder. After you finish this step, you will have your project looks like this...
  7. Edit the pom.xml file.
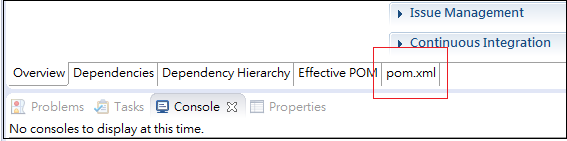
    1. Open the file pom.xml, and select the pom.xml tag.
      pom view
    2. The file pom.xml is used to manage the libraries and plugins of project.
      <project xmlns="http://maven.apache.org/POM/4.0.0" xmlns:xsi="http://www.w3.org/2001/XMLSchema-instance"
      xsi:schemaLocation="http://maven.apache.org/POM/4.0.0 http://maven.apache.org/xsd/maven-4.0.0.xsd">
      <modelVersion>4.0.0</modelVersion>
      
       <groupId>idv.jiaming</groupId>
       <artifactId>spark-scala-demo</artifactId>
       <version>0.0.1-SNAPSHOT</version>
       <packaging>jar</packaging>
      
       <name>spark-scala-demo</name>
       <url>http://maven.apache.org</url>
      
       <properties>
           <project.build.sourceEncoding>UTF-8</project.build.sourceEncoding>
       </properties>
      
       <dependencies>
           <dependency>
               <groupId>junit</groupId>
               <artifactId>junit</artifactId>
               <version>3.8.1</version>
               <scope>test</scope>
           </dependency>
       </dependencies>
      </project>
      
      The tag dependencies shows all the libraries you included into the project, Maven would download all those libraries and their dependencies automatically. In order to make the Maven to ompile and build the scala project, we have to add two plugins.
    3. To add the Spark as dependency, insert the following dependency matadata to dependenciessection.
      <dependency>
       <groupId>org.apache.spark</groupId>
       <artifactId>spark-core_2.11</artifactId>
       <version>1.5.2</version>
      </dependency>
      
      Note that, for the reason of convenience, I specified the Spark version as 1.5.2. But the version should be same with your pre-installed Spark version.
    4. Before adding plugins, insert a new section <build></build> in the <project> section.
      <project xmlns=...>
      ...
       <dependencies>
         <dependency>
         ...
         </dependency>
       </dependencies>
       <build>
       </build>
      </project>
      
    5. Adding two plugins in the <build> section
      <build>
        <plugins>
           <plugin>
           ...
           </plugin>
           <plugin>
           ...
           </plugin>
        </plugins>
      </build>
      
    6. Setitng the first plugin as following.
       <plugin>
           <groupId>net.alchim31.maven</groupId>
           <artifactId>scala-maven-plugin</artifactId>
           <version>3.1.3</version>
           <executions>
               <execution>
                   <goals>
                       <goal>compile</goal>
                       <goal>testCompile</goal>
                   </goals>
                   <configuration>
                       <args>
                           <arg>-make:transitive</arg>
                           <arg>-dependencyfile</arg>
                           <arg>${project.build.directory}/.scala_dependencies</arg>
                       </args>
                   </configuration>
               </execution>
           </executions>
       </plugin>
      
    7. And the second plugin
       <plugin>
           <artifactId>maven-assembly-plugin</artifactId>
           <version>2.4.1</version>
           <configuration>
               <descriptorRefs>
                   <descriptorRef>jar-with-dependencies</descriptorRef>
               </descriptorRefs>
           </configuration>
           <executions>
               <execution>
                   <id>make-assembly</id>
                   <phase>package</phase>
                   <goals>
                       <goal>single</goal>
                   </goals>
               </execution>
           </executions>
       </plugin>
      
    8. To specify the source code path by adding the <sourceDirectory> tag.
      <build>
       <sourceDirectory>src/main/scala</sourceDirectory>
       <plugins>
       ...
       </plugins>
      </build>
      
      The value of <sourceDirectory>, which should be same with the source folder src/main/scalawe have just setup above. And note that, if setup with different source folder path, you should specify the value to your own path instead.
    9. (Optional) In the real project, it is common to contain the unit test code. For example, in this setup tutorial, we create a directory src/main/test and set it as source folder. Also we have to specify the path in pom.xml.
      <build>
       <sourceDirectory>src/main/scala</sourceDirectory>
       <testSourceDirectory>src/test/scala</testSourceDirectory>
       <plugins>
       ...
       </plugins>
      </build>
      
    10. Saving the change, Maven would start to pull all the dependencies and plugins from internet and build the project. This step takes times depende on the network bandwidth.
  8. After the dependencies pulling and project building finished, we are ready the write the first Spark in Scala program.

First Spark Application in Scala.

Now let's create an Spark application in Scala to estimate the value of Pi.
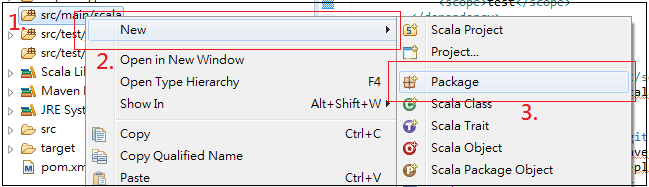
  1. Creating a new package in /src/main/scala and specifying a package name.new package
    The first one step is right click on the source folder /src/main/scala
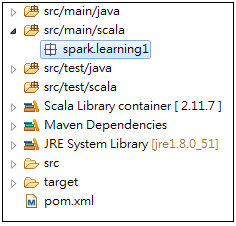
  2. Suppose that, I use the name spark.practice1 as my package name. We will see one empty package spark.practice1 in Eclipse Project Explore.
    new scala package
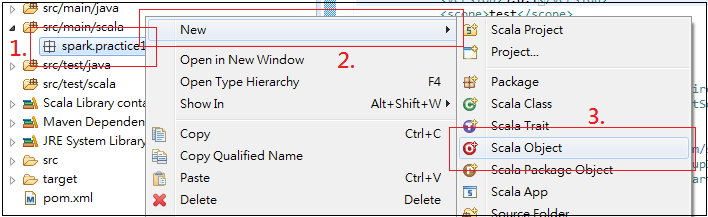
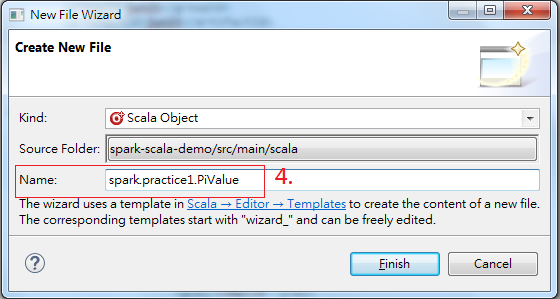
  3. Creating a new Scala Object in package spark.practice1 which is named PiValue
    new object
    new object
    Analogues to the create package step, the first step is right click on package.
  4. The initial content of Scala Object.
     package spark.practice1
    
     object PiValue {
    
     }
    
  5. Writing an application to estimate Pi, copy and paste the following list.
     package spark.practice1
    
     import org.apache.spark.SparkConf
     import org.apache.spark.SparkContext
    
     object PiValue {
    
     def main(arg: Array[String]) {
    
         val conf = new SparkConf().setAppName("PiValueEstimate").setMaster("local[2]")
         val sc = new SparkContext(conf)    
         val NUM_SAMPLES = Integer.parseInt(arg(0))
    
         val count = sc.parallelize(1 to NUM_SAMPLES).map { i =>
             val x = Math.random()
             val y = Math.random()
             if (x * x + y * y < 1) 1 else 0
         }.reduce(_ + _)
         println("Pi is roughly " + 4.0 * count / NUM_SAMPLES)
       }
     }
    
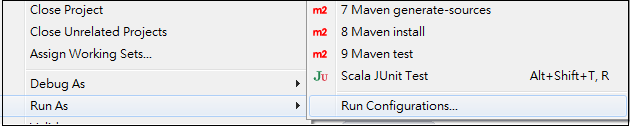
  6. Right click on the project name, and select Run As... on the menu, then select Run Configurations... to open a configure wizard. 
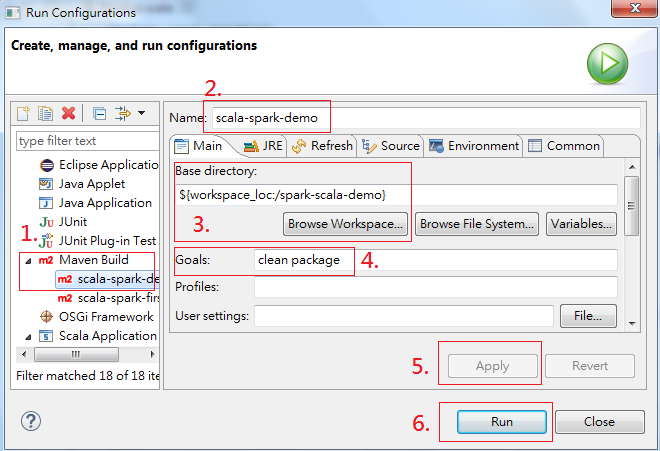
  7. The configuration wizard. 
    1. New a Maven Build configuration.
    2. Specify the configuration name.
    3. Specify the project path, you can click the button Browse Workspace to list all the available projects.
    4. Specify the Maven functions. Now, we just fill clean package into the text box.
    5. Click the Apply button to save modifications.
    6. Click the Run button to run Maven Build.
  8. The Maven Build messages would show in the Console, the first build would take more times since Maven has to grab dependencies on Internet.
  9. After you see the success message
    [INFO] --- maven-assembly-plugin:2.4.1:single (make-assembly) @ spark-scala-demo ---
    [INFO] Building jar: D:\GitHome\scala\spark-scala-demo\target\spark-scala-demo-0.0.1-SNAPSHOT-jar-with-dependencies.jar
    [INFO] ------------------------------------------------------------------------
    [INFO] BUILD SUCCESS
    [INFO] ------------------------------------------------------------------------
    [INFO] Total time: 01:00 min
    [INFO] Finished at: 2016-01-07T22:44:43+08:00
    [INFO] Final Memory: 72M/619M
    [INFO] ------------------------------------------------------------------------
    
    The Maven will tell where to find the executable jar file, In this example, the jar file is located at
     D:\GitHome\scala\spark-scala-demo\target\spark-scala-demo-0.0.1-SNAPSHOT-jar-with-dependencies.jar
    
  10. Open your terminal with the Spark Client installed, and using command to submit Spark Job
    # spark-submit spark-scala-demo-0.0.1-SNAPSHOT-jar-with-dependencies.jar spark.practice1.PiValue 10000
    
    Where spark.practice1.PiValue specifies the path of main function, 10000 specifies the first input parameter of main function and it is also the samples number in the Pi calculations.
    Note that, we don't have to specify the execution mode since we have already specified in the application as local[2].
     val conf = new SparkConf().setAppName("PiValueEstimate").setMaster("local[2]")

張貼者: Unknown 於 凌晨12:40 沒有留言:
以電子郵件傳送這篇文章BlogThis!分享至 X分享至 Facebook分享到 Pinterest
標籤: Scala, Spark
較舊的文章 首頁
訂閱: 文章 (Atom)

關於我自己

Unknown
檢視我的完整簡介

網誌存檔

  • ▼  2016 (8)
    • ▼  1月 (8)
      • Customize the FileInputFormat to Read Whole File
      • Vasya - Clerk
      • Storage: Configure Disks, Partitions and Disk Moun...
      • Spark Laoding Data From S3
      • Using Maven to build Spark Job in Scala
      • Triangle Type
      • How many consecutive numbers are needed?
      • Is it a eight bit signed number?
簡單主題. 技術提供:Blogger.